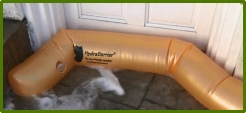
How To Fill Your HydraBarrier Standard / Ultra and HydraBarrier Supreme – Instructions
Just place and fill — it is really that easy!
- Remove HydraBarrier from packaging.
- Unfold the HydraBarrier and place where it will be used.
- Using the two plastic loops attached to the fill cap, pull filler cap from HydraBarrier
body until it pops out, providing easy access to the spout for filling. Remove outer
cap by unscrewing. There is a secondary inner cap that is removed by simply prying
out with a fingernail or blunt knife.
- Once both caps are removed, fill using standard garden hose.
Note : Use of inner cap
is optional and not required if lost in the future - Once sufficiently filled, pop the inner cap back in to place and screw the outer
cap back on the HydraBarrier.
How To Fill Your HydraBarrier Supreme –
Instructions
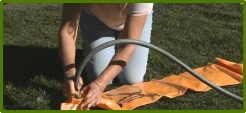
- Remove HydraBarrier Supreme from packaging.
- Unfold the HydraBarrier Supreme and place it where it will be used.
- Simply unscrew the black fill spout and fill using a standard garden hose. The HydraBarrier
Supreme is designed with a fill spout large enough to accept a standard garden hose
pushed inside the HydraBarrier Supreme. This can be convenient when filling 12 ft
and 24 ft models as the fill time can take longer than with the smaller models.
- Once sufficiently filled, screw the outer cap back on the HydraBarrier Supreme and
it is ready for action.
Keep in mind: Although HydraBarriers are constructed from robust material; they can
still be punctured under extreme strain. Use common sense when placing near or dragging
over sharp objects.
Optimal Filling – Guidelines
- Fill HydraBarriers such that they are still soft and form nicely to the ground below
or around any chosen structure. This allows for the maximum surface area of the HydraBarrier
water tube to be in contact with the ground resulting in maximum stability when multiple
HydraBarriers are in use.